Getting Started with Hytale Modding
Ready to make Hytale truly yours? I'll walk you through building your first mod from scratch - the guide I wished I had when I was starting out.
So you want to create mods for Hytale? I get it - there’s something magical about taking a game you love and making it yours. Maybe you’ve got a cool idea for new items, dreamed up a custom interface, or want to build automation systems that would make the vanilla game jealous. Whatever’s sparked your interest, you’re in the right place.
I’ve been through the “where do I even start?” phase, and I wrote this guide to be the one I wished I had. We’ll go step by step, and by the end, you’ll have a real, working mod.
By the end of this guide, you’ll be able to:
- Set up a complete Hytale mod project from scratch
- Understand how mods are structured and why
- Create and register your first plugin
- Display custom UIs to players
- Handle player interactions and events
- Package your mod for testing and distribution
This guide assumes you’ve got some familiarity with Java. If you’re completely new to programming, don’t panic! We’ll explain concepts as we go, and the patterns here are approachable once you see them in action. You might just pick up Java along the way.
NOTE
This guide is the first in a series. Once you’ve got the basics down here, head over to Your First Hytale UI to learn how to create beautiful custom interfaces.
Table of Contents
- What is a Hytale Mod?
- Setting Up Your Development Environment
- Project Structure
- The Manifest File
- Your First Plugin Class
- The Plugin Lifecycle
- Displaying Custom UIs
- Handling UI Events
- Working with Assets
- Building and Testing Your Mod
- Common Patterns and Best Practices
- What’s Next
What is a Hytale Mod?
At its core, a Hytale mod is a Java application that runs alongside the Hytale server. It can add new features, tweak game behaviour, create custom interfaces, and generally extend what’s possible in ways the original developers never imagined. Mods get packaged as JAR files (Java archives) and can include both code and assets like textures, UI layouts, and 3D models.
Here’s how the pieces fit together:
- Your Java code defines the logic: what happens when a player clicks a button, how your custom items behave, when to show or hide interfaces.
- The manifest file tells Hytale about your mod: its name, version, entry point, and what it depends on.
- Asset files provide visual and audio resources: textures, UI layouts, sounds, and 3D models.
- The Hytale Server API provides the tools your code uses to interact with the game world, players, and systems.
When the server starts, it discovers your mod, reads its manifest, loads your plugin class, and gives you opportunities to set up your systems and respond to game events.
Setting Up Your Development Environment
Before we write any code, let’s make sure you’ve got everything you need. This bit isn’t the most exciting part, but getting your environment right now saves a lot of headaches later. Trust me on this one.
What You’ll Need
- Java Development Kit (JDK) 21 or newer - Hytale mods require modern Java features
- A Java IDE - IntelliJ IDEA Community Edition (free) or VS Code with Java extensions
- Gradle - Our build tool for compiling and packaging
- The Hytale Server JAR - The API we’ll code against
Installing the JDK
If you don’t have Java installed:
- Download the JDK from Adoptium (the recommended OpenJDK distribution)
- Choose version 21 or newer for your operating system
- Run the installer and follow the prompts
- Verify the installation by opening a terminal and typing:
java --versionYou should see output showing Java 21 or higher. If you do, you’re golden!
Setting Up Your IDE
For IntelliJ IDEA (recommended):
- Download IntelliJ IDEA Community Edition from JetBrains
- Install and launch it
- When creating your project, IntelliJ will handle Gradle integration automatically
For VS Code:
- Install the “Extension Pack for Java” from the Extensions marketplace
- Install the “Gradle for Java” extension
- You’re ready to go!
Getting the Hytale Server JAR
You’ll need the Hytale server JAR file to compile your mod. This is where all the classes and interfaces live that your mod will talk to. Think of it as the dictionary your code uses to understand how to speak “Hytale”.
Where to find it:
The HytaleServer.jar is located inside your Hytale game installation. The exact path depends on your operating system:
| OS | Path |
|---|---|
| macOS | ~/Library/Application Support/Hytale/install/release/package/game/latest/Server/HytaleServer.jar |
| Linux (Arch/CachyOS, Fedora, Ubuntu, etc.) | ~/.local/share/Hytale/install/release/package/game/latest/Server/HytaleServer.jar |
| Windows | %APPDATA%\Hytale\install\release\package\game\latest\Server\HytaleServer.jar |
NOTE
You must have Hytale installed via the official launcher to have access to this file. The release folder might be named pre-release if you’re using a pre-release version.
Option A: Copy to libs folder (simple)
Copy the JAR to a libs folder in your project:
my-mod/
└── libs/
    └── HytaleServer.jar
Then reference it in your build.gradle.kts:
dependencies {
    compileOnly(files("libs/HytaleServer.jar"))
}
Option B: Reference directly from Hytale installation (recommended)
You can reference the JAR directly from your Hytale installation. This way you’ll automatically get updates when the game updates. Add this to your build.gradle.kts:
val hytaleHome = System.getProperty("user.home") + when {
    System.getProperty("os.name").lowercase().contains("mac") -> "/Library/Application Support/Hytale"
    System.getProperty("os.name").lowercase().contains("win") -> "/AppData/Roaming/Hytale"
    else -> "/.local/share/Hytale"  // Linux (Arch/CachyOS, Fedora, Ubuntu, etc.)
}
val patchline = "release"  // or "pre-release"

dependencies {
    compileOnly(files("$hytaleHome/install/$patchline/package/game/latest/Server/HytaleServer.jar"))
}
IMPORTANT
The server JAR is used only for compilation - it’s like a reference book, not something you ship. Players running your mod will already have it as part of their Hytale installation.
Project Structure
A well-organized project makes development so much easier. Future-you will thank present-you for taking a few minutes to set things up properly. Here’s the structure I recommend:
my-awesome-mod/
├── build.gradle.kts          # Build configuration
├── settings.gradle.kts       # Project settings
├── gradle.properties         # Version and group info
├── libs/
│   └── HytaleServer.jar      # Hytale API (compile-only)
└── src/
    └── main/
        ├── java/
        │   └── com/
        │       └── yourname/
        │           └── mymod/
        │               ├── MyModPlugin.java      # Main entry point
        │               ├── config/               # Configuration classes
        │               ├── ui/                   # UI-related code
        │               │   └── page/             # UI page handlers
        │               ├── handlers/             # Event handlers
        │               └── util/                 # Utility classes
        └── resources/
            ├── manifest.json                     # Mod metadata
            ├── Common/                           # Shared assets
            │   ├── UI/
            │   │   └── Custom/
            │   │       └── Pages/
            │   │           └── MyMod/            # Your UI layouts
            │   │               └── MyPage.ui
            │   ├── Icons/                        # Icon textures
            │   └── Blocks/                       # Block textures/models
            └── Server/                           # Server-side assets
                └── Item/
                    └── Items/                    # Item definitions
Let’s break down what each part does:
| Directory/File | Purpose |
|---|---|
build.gradle.kts | Tells Gradle how to compile and package your mod |
libs/ | Contains the Hytale server JAR for compilation |
src/main/java/ | Your Java source code |
src/main/resources/manifest.json | Metadata that tells Hytale about your mod |
src/main/resources/Common/ | Assets shared between client and server |
src/main/resources/Server/ | Server-only data like item definitions |
Creating Your Project
Let’s create a new project step by step.
1. Create the directory structure:
mkdir my-awesome-mod
cd my-awesome-mod
mkdir -p src/main/java/com/yourname/mymod
mkdir -p src/main/resources/Common/UI/Custom/Pages/MyMod
mkdir -p src/main/resources/Server/Item/Items
mkdir libs
2. Create settings.gradle.kts:
rootProject.name = "my-awesome-mod"3. Create gradle.properties:
maven_group=com.yourname
version=1.0.0
4. Create build.gradle.kts:
plugins {
    `java-library`
    id("com.gradleup.shadow") version "9.3.1"
}

group = property("maven_group")!!
version = property("version")!!

java {
    sourceCompatibility = JavaVersion.VERSION_21
    targetCompatibility = JavaVersion.VERSION_21
}

repositories {
    mavenCentral()
}

dependencies {
    compileOnly(files("libs/HytaleServer.jar"))
}

tasks.shadowJar {
    archiveClassifier.set("")
    mergeServiceFiles()
}

tasks.build {
    dependsOn(tasks.shadowJar)
}

tasks.jar {
    manifest {
        attributes(
            "Implementation-Title" to project.name,
            "Implementation-Version" to project.version
        )
    }
}
This build configuration does several important things:
- Compiles your Java code against the Hytale server API
- Uses the Shadow plugin to create a “fat JAR” with all dependencies included
- Includes all your resources (manifest.json, Common/, Server/) inside the JAR automatically
- Targets Java 21 compatibility (works with Java 21, 22, 23, 24, or any newer version)
Because we set IncludesAssetPack: true in our manifest, the server knows to load assets directly from the JAR file. Everything gets bundled into one neat package.
NOTE
The sourceCompatibility and targetCompatibility settings ensure your mod is compiled for Java 21 compatibility. This means anyone with Java 21 or newer can run your mod. You don’t need to have exactly Java 21 installed - any version from 21 onwards will work fine.
The Manifest File
The manifest file is your mod’s introduction to Hytale - it tells the game “hey, I exist, here’s my name, and this is the class you should load to get me started.” Without it, Hytale won’t even know your mod is there.
Create src/main/resources/manifest.json:
{
  "Group": "com.yourname",
  "Name": "MyAwesomeMod",
  "Main": "com.yourname.mymod.MyModPlugin",
  "Version": "1.0.0",
  "Description": "A description of what your mod does",
  "Authors": [
    {
      "Name": "Your Name"
    }
  ],
  "Website": "https://github.com/yourname/mymod",
  "ServerVersion": "*",
  "IncludesAssetPack": true,
  "Dependencies": {},
  "DisabledByDefault": false
}
Let’s understand each field:
| Field | Required | Description |
|---|---|---|
Group | Yes | Your organization/package identifier (usually matches your Java package) |
Name | Yes | The display name of your mod |
Main | Yes | The fully qualified class name of your plugin entry point |
Version | Yes | Your mod’s version (use semantic versioning) |
Description | No | A brief description shown in mod lists |
Authors | No | Array of author objects with Name and optional Email |
Website | No | URL for more information |
ServerVersion | Yes | Which server versions are compatible ("*" means all) |
IncludesAssetPack | Yes | Set to true if you have assets in Common/ or Server/ |
Dependencies | No | Other mods your mod requires (see below) |
DisabledByDefault | No | If true, server admins must explicitly enable your mod |
Declaring Dependencies
If your mod requires other mods to function, declare them:
{
  "Dependencies": {
    "BangPlays_HyVoltage": ">=1.0.0"
  },
  "OptionalDependencies": {
    "Ellie_HyUI": "*"
  }
}- Dependencies are required: your mod won’t load without them
- OptionalDependencies are nice-to-have: your mod works without them but gains features if they’re present
Your First Plugin Class
Now we’re getting to the good stuff! The plugin class is the heart of your mod - it’s where everything begins and where you’ll orchestrate all your mod’s behaviour.
Create src/main/java/com/yourname/mymod/MyModPlugin.java:
package com.yourname.mymod;

import com.hypixel.hytale.server.core.plugin.JavaPlugin;
import com.hypixel.hytale.server.core.plugin.JavaPluginInit;

import javax.annotation.Nonnull;
import java.util.logging.Level;

public class MyModPlugin extends JavaPlugin {

    private static MyModPlugin instance;

    public MyModPlugin(@Nonnull JavaPluginInit init) {
        super(init);
        instance = this;
        getLogger().at(Level.INFO).log("MyAwesomeMod is loading...");
    }

    @Override
    protected void setup() {
        // Phase 1: Initialize your mod's core systems
        // This runs before the server is fully started

        getLogger().at(Level.INFO).log("Setting up MyAwesomeMod...");

        // Register event listeners
        // Initialize configuration
        // Set up data storage
    }

    @Override
    protected void start() {
        // Phase 2: The server is now running
        // Safe to interact with the world and other plugins

        getLogger().at(Level.INFO).log("MyAwesomeMod is now active!");
    }

    @Override
    protected void shutdown() {
        // Clean up when the server stops
        // Save data, release resources

        getLogger().at(Level.INFO).log("MyAwesomeMod is shutting down...");
    }

    public static MyModPlugin getInstance() {
        return instance;
    }
}
Let’s break down what’s happening:
-
The constructor receives initialization data and is where you perform the most basic setup. Keep this lightweight.
-
setup()is called during server startup. This is where you register systems, event handlers, and prepare your mod’s infrastructure. At this point, other plugins are still loading. -
start()is called after all plugins have completed theirsetup()phase. Now you can safely interact with other mods and the game world. -
shutdown()is called when the server stops. Save any data, clean up resources, and say goodbye gracefully. -
The static instance makes it easy for other parts of your code to access your plugin. This is a common pattern in mod development.
The Plugin Lifecycle
Understanding when things happen is crucial. Here’s the full lifecycle of a Hytale mod:
Server Starting
      │
      ▼
┌─────────────────┐
│   Constructor   │  Your plugin is instantiated
└────────┬────────┘
         │
         ▼
┌─────────────────┐
│     setup()     │  Register systems, handlers, components
└────────┬────────┘
         │
         ▼
   Other plugins
   finish setup()
         │
         ▼
┌─────────────────┐
│     start()     │  Server is ready, start your systems
└────────┬────────┘
         │
         ▼
    Server Running
   (players join, events fire, your code responds)
         │
         ▼
┌─────────────────┐
│   shutdown()    │  Server stopping, clean up
└─────────────────┘
What to Do in Each Phase
In the constructor:
- Store the instance reference
- Log that you’re loading
- Minimal work only
In setup():
- Load configuration from files
- Register custom block states, components, and codecs
- Register event handlers
- Register custom UI pages
- Initialize services that don’t need the world
In start():
- Start background tasks
- Connect to other plugins’ APIs
- Begin any world-dependent operations
- Log that you’re ready
In shutdown():
- Save any unsaved data
- Cancel background tasks
- Release external resources
- Log that you’re done
WARNING
Never do heavy work in the constructor. If your constructor throws an exception, your mod fails to load entirely - and that’s a really annoying bug to track down. Save the complex initialisation for setup() where errors are handled more gracefully.
Displaying Custom UIs
This is where things get really fun! Showing custom interfaces to players is one of the most powerful features of Hytale modding, and honestly, it’s where your mod goes from “cool concept” to “thing players can actually interact with.” Let’s walk through the complete process.
Step 1: Create the UI Layout File
First, create a .ui file that defines what your interface looks like. This goes in src/main/resources/Common/UI/Custom/Pages/MyMod/HelloWorld.ui:
$C = "../../Common.ui";

$C.@PageOverlay {
  $C.@DecoratedContainer {
    Anchor: (Width: 400, Height: 300);

    #Title {
      $C.@Title {
        @Text = "Hello, Player!";
      }
    }

    #Content {
      LayoutMode: Top;
      Padding: (Full: 20);

      Label #WelcomeMessage {
        Text: "Welcome to my awesome mod!";
        Anchor: (Height: 40);
        Style: (
          FontSize: 18,
          TextColor: #ffffff,
          HorizontalAlignment: Center
        );
      }

      TextButton #CloseButton {
        Text: "Close";
        Anchor: (Height: 44);
        Style: $C.@DefaultTextButtonStyle;
      }
    }
  }
}

$C.@BackButton {}
This creates a centered dialog with a title, a welcome message, and a close button. The $C = "../../Common.ui" line imports Hytale’s built-in templates and styles.
TIP
Don’t worry if the UI syntax looks unfamiliar - we’ll cover it properly in Your First Hytale UI. For now, just know that this file defines what your interface looks like, and the Java code controls what it does.
Step 2: Create the UI Page Handler
Now create a Java class that controls this UI. This is where you handle events like button clicks and update the display dynamically.
Create src/main/java/com/yourname/mymod/ui/page/HelloWorldPage.java:
package com.yourname.mymod.ui.page;

import com.hypixel.hytale.codec.Codec;
import com.hypixel.hytale.codec.KeyedCodec;
import com.hypixel.hytale.codec.builder.BuilderCodec;
import com.hypixel.hytale.component.Ref;
import com.hypixel.hytale.component.Store;
import com.hypixel.hytale.protocol.packets.interface_.CustomPageLifetime;
import com.hypixel.hytale.protocol.packets.interface_.CustomUIEventBindingType;
import com.hypixel.hytale.server.core.entity.entities.player.pages.InteractiveCustomUIPage;
import com.hypixel.hytale.server.core.ui.builder.UICommandBuilder;
import com.hypixel.hytale.server.core.ui.builder.UIEventBuilder;
import com.hypixel.hytale.server.core.universe.PlayerRef;
import com.hypixel.hytale.server.core.universe.world.storage.EntityStore;

import javax.annotation.Nonnull;

public class HelloWorldPage extends InteractiveCustomUIPage<HelloWorldPage.EventData> {

    // Path to your .ui file (relative to Common/UI/Custom/)
    private static final String UI_TEMPLATE = "Pages/MyMod/HelloWorld.ui";

    public HelloWorldPage(@Nonnull PlayerRef playerRef) {
        super(playerRef, CustomPageLifetime.CanDismissOrCloseThroughInteraction, EventData.CODEC);
    }

    @Override
    public void build(@Nonnull Ref<EntityStore> ref, @Nonnull UICommandBuilder commandBuilder,
                      @Nonnull UIEventBuilder eventBuilder, @Nonnull Store<EntityStore> store) {

        // Load the UI template
        commandBuilder.append(UI_TEMPLATE);

        // You can customize the UI dynamically here
        // For example, set the player's name in the message:
        // commandBuilder.set("#WelcomeMessage.Text", "Welcome, " + playerName + "!");

        // Bind the close button to an action
        eventBuilder.addEventBinding(
            CustomUIEventBindingType.Activating,  // When button is clicked
            "#CloseButton",                        // The element ID
            EventData.action("CLOSE"),             // The action to trigger
            false                                  // Don't close automatically
        );
    }

    @Override
    public void handleDataEvent(@Nonnull Ref<EntityStore> ref, @Nonnull Store<EntityStore> store,
                                @Nonnull EventData data) {

        String action = data.getAction();

        switch (action) {
            case "CLOSE" -> {
                // Close the UI
                this.close();
            }
            // Handle other actions here
        }
    }

    // Event data codec - defines what data your events carry
    public static class EventData {
        public static final BuilderCodec<EventData> CODEC = BuilderCodec
            .builder(EventData.class, EventData::new)
            .append(new KeyedCodec<>("Action", Codec.STRING),
                    (d, v) -> d.action = v, d -> d.action)
            .add()
            .build();

        private String action = "";

        public String getAction() {
            return action;
        }

        public static com.hypixel.hytale.server.core.ui.builder.EventData action(String action) {
            return com.hypixel.hytale.server.core.ui.builder.EventData.of("Action", action);
        }
    }
}
Let’s understand the key parts:
The constructor takes a PlayerRef (reference to the player this UI is for) and passes it to the parent class along with:
- A
CustomPageLifetimethat determines when the UI can be closed - A codec that defines how event data is serialized
The build() method is called when the UI is first displayed. Here you:
- Load your UI template with
commandBuilder.append() - Customize elements with
commandBuilder.set() - Bind events with
eventBuilder.addEventBinding()
The handleDataEvent() method is called when the player interacts with your UI. You receive the event data and respond accordingly.
Step 3: Register the UI Page
In your plugin’s setup() method, register the page so the game knows about it:
import com.hypixel.hytale.server.core.modules.interaction.interaction.config.server.OpenCustomUIInteraction;

@Override
protected void setup() {
    // ... other setup code ...

    // Register the UI page
    OpenCustomUIInteraction.registerSimple(
        this,                                    // Your plugin instance
        HelloWorldPage.class,                    // The page class
        "mymod:hello_world_page",                // A unique page ID
        HelloWorldPage::new                      // Constructor reference
    );

    getLogger().at(Level.INFO).log("Registered HelloWorld UI page");
}
Step 4: Show the UI to a Player
Now you can display the UI whenever you want. For example, in response to a command or when a player interacts with something:
import com.hypixel.hytale.server.core.entity.entities.Player;
import com.hypixel.hytale.server.core.universe.PlayerRef;

public void showHelloWorld(Player player) {
    PlayerRef playerRef = player.getRef();

    // Create and show the page
    HelloWorldPage page = new HelloWorldPage(playerRef);
    player.showPage(page);
}
Or if you only have a PlayerRef:
public void showHelloWorld(PlayerRef playerRef) {
    HelloWorldPage page = new HelloWorldPage(playerRef);
    playerRef.showPage(page);
}
IMPORTANT
The UI template path in your Java code (Pages/MyMod/HelloWorld.ui) must match the actual location of your .ui file in the resources folder (Common/UI/Custom/Pages/MyMod/HelloWorld.ui). The Common/UI/Custom/ prefix is assumed. If these don’t match, you’ll get a blank screen and a very confusing debugging session. Ask me how I know.
How UIs Get Triggered
You might be wondering: “Okay, I have a showHelloWorld() method, but what actually calls it?” Great question - I’m glad you’re thinking about this! There are several ways to trigger a UI in Hytale:
Option 1: Item Interaction (Recommended for beginners)
The simplest way is to create an item that opens your UI when used. Define the item in Server/Item/Items/MyMod_OpenUI_Tool.json:
{
  "TranslationProperties": {
    "Name": "mymod.items.open_ui_tool.name"
  },
  "Icon": "Icons/Items/MyMod_tool_icon.png",
  "Interactions": {
    "Primary": {
      "Interactions": [
        {
          "Type": "OpenCustomUI",
          "Page": {
            "Id": "mymod:hello_world_page"
          }
        }
      ]
    }
  },
  "MaxStack": 1
}
The "Id" must match the page ID you used when registering with OpenCustomUIInteraction.registerSimple(). When a player right-clicks with this item, your UI opens automatically.
Option 2: Block Interaction
Similarly, you can make a block open your UI when interacted with. In your block’s JSON definition:
{
  "Interactions": {
    "Primary": {
      "Interactions": [
        {
          "Type": "OpenCustomUI",
          "Page": {
            "Id": "mymod:hello_world_page"
          }
        }
      ]
    }
  }
}
Option 3: Event Listener (More advanced)
For more control, listen for game events and show the UI programmatically:
// In your plugin's setup() method
getEventRegistry().registerGlobal(PlayerReadyEvent.class, event -> {
    // Show a welcome UI when a player joins
    PlayerRef playerRef = event.getPlayerRef();
    HelloWorldPage page = new HelloWorldPage(playerRef);
    playerRef.showPage(page);
});
Option 4: From Another UI
You can also open one UI from another. In your page’s handleDataEvent():
case "OPEN_SETTINGS" -> {
    this.close();
    SettingsPage settingsPage = new SettingsPage(this.getPlayerRef());
    this.getPlayerRef().showPage(settingsPage);
}
TIP
For your first mod, start with Option 1 (item interaction). It’s the simplest to set up and test, and there’s something satisfying about having a physical item that opens your UI. You can always add fancier triggers later.
Handling UI Events
Let’s dig deeper into event handling, because this is where your UI stops being a static picture and starts being something players can actually use.
Event Binding Types
When you bind an event, you specify what type of interaction triggers it:
| Event Type | When It Fires |
|---|---|
Activating | Button clicked, checkbox toggled, enter pressed in text field |
ValueChanged | Slider moved, text changed, checkbox state changed |
FocusGained | Element receives focus |
FocusLost | Element loses focus |
Most of the time, you’ll use Activating for buttons and ValueChanged for inputs.
Passing Data with Events
You can attach additional data to events:
// In build()
eventBuilder.addEventBinding(
    CustomUIEventBindingType.Activating,
    "#DeleteButton",
    EventData.action("DELETE").append("ItemId", itemId),
    false
);

// In handleDataEvent()
case "DELETE" -> {
    String itemId = data.getValue();  // Get the ItemId
    deleteItem(itemId);
    rebuildUI(ref, store);
}
To support additional data fields, extend your EventData class:
public static class EventData {
    public static final BuilderCodec<EventData> CODEC = BuilderCodec
        .builder(EventData.class, EventData::new)
        .append(new KeyedCodec<>("Action", Codec.STRING),
                (d, v) -> d.action = v, d -> d.action)
        .add()
        .append(new KeyedCodec<>("Value", Codec.STRING),
                (d, v) -> d.value = v, d -> d.value)
        .add()
        .build();

    private String action = "";
    private String value = "";

    public String getAction() { return action; }
    public String getValue() { return value; }

    public static com.hypixel.hytale.server.core.ui.builder.EventData action(String action) {
        return com.hypixel.hytale.server.core.ui.builder.EventData.of("Action", action);
    }
}
Updating the UI Dynamically
After handling an event, you often need to update the UI to reflect changes. Create a helper method:
private void rebuildUI(@Nonnull Ref<EntityStore> ref, @Nonnull Store<EntityStore> store) {
    UICommandBuilder commandBuilder = new UICommandBuilder();
    UIEventBuilder eventBuilder = new UIEventBuilder();

    // Update elements
    commandBuilder.set("#ScoreLabel.Text", "Score: " + currentScore);
    commandBuilder.set("#SubmitButton.Disabled", !isValid);

    // If you added new elements, rebind their events
    eventBuilder.addEventBinding(
        CustomUIEventBindingType.Activating,
        "#NewButton",
        EventData.action("NEW_ACTION"),
        false
    );

    // Send the update to the client
    this.sendUpdate(commandBuilder, eventBuilder, false);
}
Working with Dynamic Lists
For UIs that display lists of items (like an inventory or a menu), use the pattern of clearing and appending:
// In your build() or update method
private void buildItemList(UICommandBuilder commandBuilder, UIEventBuilder eventBuilder,
                           List<Item> items) {
    // Clear the existing list
    commandBuilder.clear("#ItemList");

    // Add each item
    for (int i = 0; i < items.size(); i++) {
        Item item = items.get(i);
        String selector = "#ItemList[" + i + "]";

        // Append an item template
        commandBuilder.append("#ItemList", "Pages/MyMod/ListItem.ui");

        // Set the item's data
        commandBuilder.set(selector + " #ItemName.Text", item.getName());
        commandBuilder.set(selector + " #ItemIcon.ItemId", item.getId());

        // Bind click event
        eventBuilder.addEventBinding(
            CustomUIEventBindingType.Activating,
            selector,
            EventData.action("SELECT_ITEM").append("Value", String.valueOf(i)),
            false
        );
    }
}
Working with Assets
Assets are the files that give your mod its visual identity: textures, UI layouts, icons, and more. Getting the paths right can be a bit fiddly at first, but once you understand the pattern, it becomes second nature.
Creating Textures and Icons
You’ll notice that item definitions reference icon paths like Icons/Items/MyMod_tool_icon.png - but where do these files come from? You need to create them!
Blockbench is the go-to free software for creating Hytale assets. It handles:
- Textures and icons - PNG files for items, blocks, and UI elements
- 3D models -
.blockymodelfiles for custom blocks and entities - Animations -
.blockyanimfiles for animated models
To get started:
- Download Blockbench from blockbench.net
- Install the Hytale plugin from blockbench.net/plugins/hytale_plugin
- Create your textures and export them as PNG files
IMPORTANT
All icon and texture images must have dimensions that are multiples of 32 pixels (32x32, 64x64, 128x128, etc.). Non-compliant images may fail to load or display incorrectly.
TIP
The Hytale Wiki’s Blockbench page has more detailed tutorials on creating models and textures specific to Hytale’s format.
Asset Directory Structure
src/main/resources/
├── manifest.json
├── Common/                          # Shared between client and server
│   ├── UI/
│   │   └── Custom/
│   │       └── Pages/
│   │           └── MyMod/           # Your UI files
│   │               ├── MyPage.ui
│   │               └── ListItem.ui
│   ├── Icons/
│   │   └── Items/                   # Item icons (required path)
│   │       ├── MyMod_cool_icon.png
│   │       └── MyMod_awesome_icon.png
│   ├── Blocks/                      # Block textures and models
│   │   └── MyBlock/
│   │       ├── MyBlock.blockymodel
│   │       └── MyBlock_Texture.png
│   └── BlockTextures/               # Additional block textures
└── Server/                          # Server-only data
    └── Item/
        ├── Items/                   # Item definitions
        │   └── My_Item.json
        └── Block/
            └── Hitboxes/            # Block hitbox definitions
Referencing Assets in UI Files
When you reference images or other assets in .ui files, the path is relative to Common/:
// For an icon at Common/Icons/MyMod/cool_icon.png
Button {
  Style: (
    Default: (Background: "Icons/MyMod/cool_icon.png")
  );
}

// For importing Common.ui (at Common/UI/Custom/Common.ui)
$C = "../../Common.ui";
Note that in .ui files, you can reference images from any path under Common/ - this is great for UI backgrounds, decorations, and other visual assets.
WARNING
Item icons have restricted paths. When defining items in Server/Item/Items/*.json, the Icon field must point to a file in either Icons/Items/ or Icons/ItemsGenerated/. Any other path will fail with an error like:
FAIL: Common Asset 'Icons/MyMod/tool.png' must be within the root: [Icons/ItemsGenerated/, Icons/Items/]This restriction only applies to item definitions - UI files can use icons from anywhere.
NOTE
All icon images must have dimensions that are multiples of 32 pixels (e.g., 32x32, 64x64, 128x128). Non-compliant images may fail to load or display incorrectly.
Referencing Assets in Java
When you reference a UI template path in Java, it’s relative to Common/UI/Custom/:
// For a file at Common/UI/Custom/Pages/MyMod/MyPage.ui
private static final String UI_TEMPLATE = "Pages/MyMod/MyPage.ui";
Creating Item Definitions
Items are defined in JSON files under Server/Item/Items/. Here’s an example for a custom item:
{
  "Id": "MyMod_CoolItem",
  "DisplayName": {
    "Type": "Translated",
    "Key": "mymod.items.cool_item.name"
  },
  "Description": {
    "Type": "Translated",
    "Key": "mymod.items.cool_item.description"
  },
  "Icon": "Icons/Items/MyMod_cool_icon.png",
  "MaxStackSize": 64,
  "Categories": ["MyMod"]
}
TIP
Use translated strings (%key.name; in UI files, "Type": "Translated" in JSON) to support multiple languages. Even if you only plan to support English right now, it’s a good habit. Future-you (or someone who wants to translate your mod) will appreciate it.
Building and Testing Your Mod
You’ve written your code and created your assets. Now for the moment of truth - let’s turn it all into a working mod and see it in action!
Setting Up the Gradle Wrapper
Before you can build, you need the Gradle wrapper files. These are small scripts that download and run the correct version of Gradle automatically.
If you have Gradle installed globally, generate the wrapper by running this once in your project directory:
gradle wrapperThis creates several files:
gradlew- Unix/macOS build scriptgradlew.bat- Windows build scriptgradle/wrapper/gradle-wrapper.jar- The wrapper JARgradle/wrapper/gradle-wrapper.properties- Wrapper configuration
TIP
Don’t have Gradle installed? Here’s how to get it:
macOS - If you have Homebrew (a popular package manager), run:
brew install gradleLinux (Arch/CachyOS) - Use pacman or an AUR helper like paru:
sudo pacman -S gradle
# or with paru
paru -S gradle
Linux (Fedora) - Use dnf:
sudo dnf install gradleLinux (Ubuntu/Debian) - Use apt:
sudo apt install gradleWindows - If you have Chocolatey or Scoop, run:
choco install gradle
# or
scoop install gradle
Any platform - Download directly from gradle.org/install. Extract the ZIP, add the bin folder to your PATH, and you’re set.
After installation, verify it works with gradle --version.
Once you have the wrapper files, you can use ./gradlew (or gradlew.bat on Windows) to run any Gradle command without needing Gradle installed globally.
Building with Gradle
From your project’s root directory, run:
./gradlew buildOn Windows:
gradlew.bat buildThis will:
- Compile your Java code
- Bundle your resources (manifest, UI files, item definitions) into the JAR
- Create the final JAR file in
build/libs/
You should see one file:
my-awesome-mod-1.0.0.jar- Your compiled code and assets, all in one
Installing Your Mod
Installing a mod is simple - just copy a single file.
Finding your mods folder:
| OS | Path |
|---|---|
| macOS | ~/Library/Application Support/Hytale/UserData/Mods/ |
| Linux (Arch/CachyOS, Fedora, Ubuntu, etc.) | ~/.local/share/Hytale/UserData/Mods/ |
| Windows | %APPDATA%\Hytale\UserData\Mods\ |
NOTE
The UserData/Mods/ folder is created automatically when you first run Hytale. If you don’t see it, launch the game once first, or create the folder manually.
Installing the mod:
- Copy the JAR file to your
Mods/folder - Start the Hytale server - that’s it!
Because we set IncludesAssetPack: true in our manifest.json, the server knows to load assets (UI files, textures, item definitions) directly from inside the JAR. No need to extract anything.
Your Mods folder should look something like this:
Mods/
└── my-awesome-mod-1.0.0.jar
Enabling Mods In-Game
Here’s something that trips up a lot of first-time modders: just putting your mod in the folder doesn’t automatically enable it. Hytale uses a per-world mod system, which means you choose which mods are active for each world individually. This is actually really nice once you get used to it - you can have different worlds with different mod combinations without conflicts.
IMPORTANT
Back up your world first! Before enabling any mod on a world you care about, make sure you’ve saved and backed it up. If something goes wrong with a mod, you can disable it and load your backup without losing progress. Better safe than sorry.
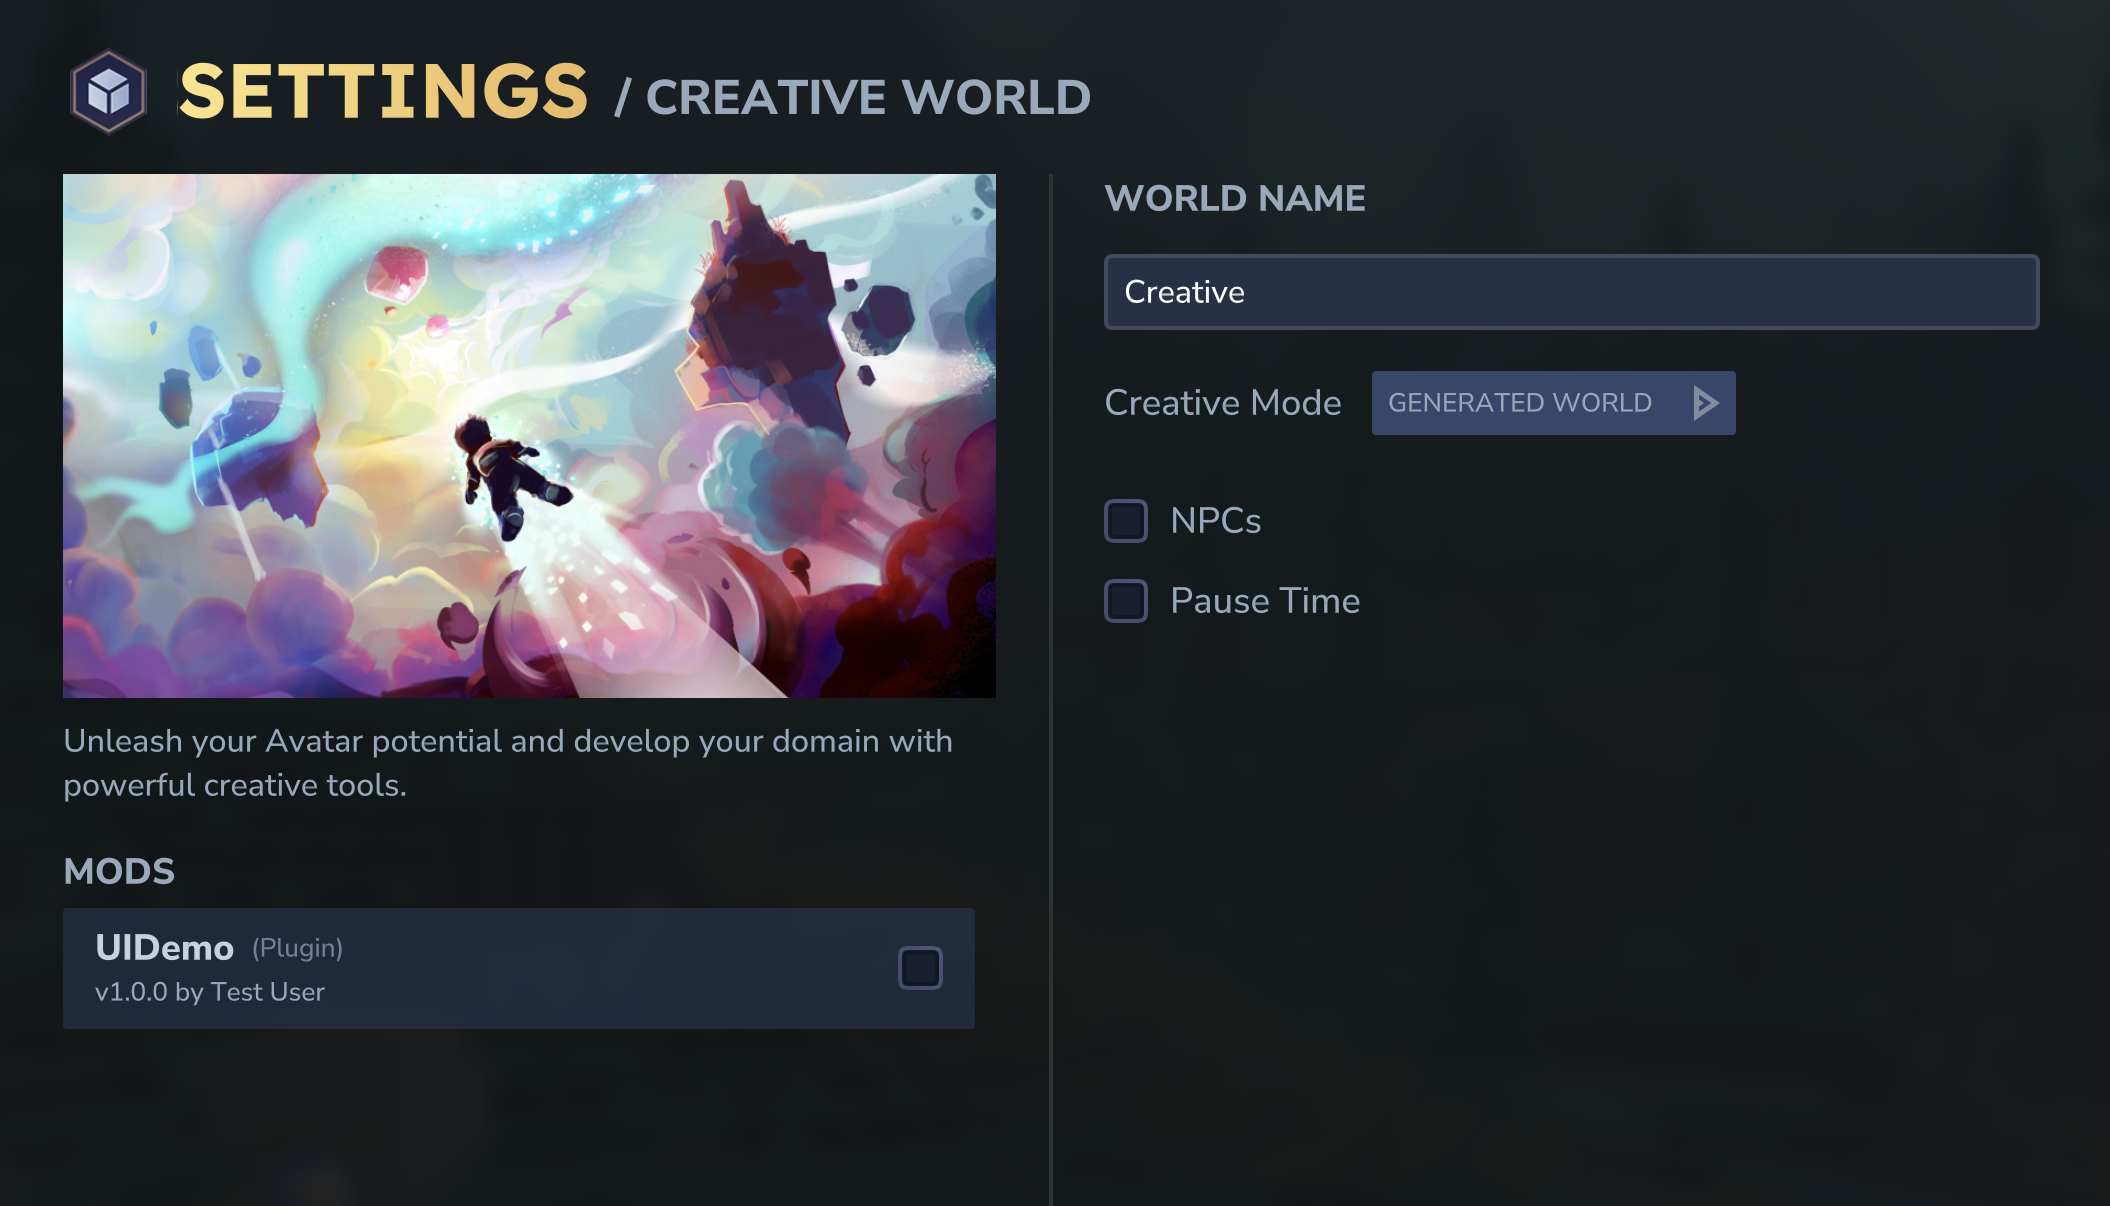
To enable mods on an existing world:
- Launch Hytale and wait for it to fully load
- Go to the world selection menu
- Right-click on the world you want to mod - this opens the world’s Settings panel
- Scroll down to find the MODS section at the bottom
- You’ll see a list of all installed mods showing their name, type (e.g., “Plugin”), version, and author
- Check the checkbox next to each mod you want to enable for this world
- Close the settings and launch the world
That’s it! When the world loads, your enabled mods will be active.
Enabling mods when creating a new world:
You can also select mods right when you’re creating a new world. During world creation, you’ll see the same MODS section where you can check which mods you want active from the start. This is handy when you’re setting up a fresh world specifically for a modded playthrough.
TIP
The per-world mod system means you can safely experiment. Create a test world, enable your mod there, and play around. If something breaks or you don’t like it, your other worlds remain completely unaffected.
What shows up in the mods list?
Each installed mod appears with:
- Name - The mod’s display name from its manifest
- Type - Usually “Plugin” for Java mods
- Version - The version number (e.g., “v1.0.0”)
- Author - Who made the mod
If your mod doesn’t appear in the list, double-check that:
- The JAR file is in the correct
Mods/folder - The
manifest.jsoninside the JAR is valid - There are no errors in the Hytale logs when loading
TIP
When would you use a separate assets pack? There are two main scenarios:
- Asset-only mods - If you’re creating a texture pack, UI theme, or sound replacement with no Java code, you’d zip up just the assets with a manifest.json and drop that in the Mods folder.
- Independent asset updates - If you want to update textures or UI layouts without recompiling Java code, you could keep them separate. But for most mods, keeping everything in one JAR is simpler.
Running a Development Server
For faster iteration during development, you can run the Hytale server directly from your project without copying files:
java -jar /path/to/HytaleServer.jar \
  --assets=/path/to/Hytale/install/release/package/game/latest/Assets.zip \
  --mods=/path/to/your-mod/src/main/resources \
  --allow-op \
  --accept-early-plugins
Replace the paths with your actual locations:
--assetspoints to the game’s Assets.zip (same location as HytaleServer.jar)--modspoints to your mod’s resources folder containingmanifest.json
This setup lets you edit .ui files and see changes after a server restart, without needing to rebuild or copy assets each time.
TIP
Create a shell script or batch file with these commands - you’ll be running them a lot during development. Many IDEs also let you configure run configurations that launch the server with these arguments, which is even nicer.
Check the server logs for your startup messages:
[INFO] MyAwesomeMod is loading...
[INFO] Setting up MyAwesomeMod...
[INFO] Registered HelloWorld UI page
[INFO] MyAwesomeMod is now active!
Debugging Tips
When things go wrong (and they will - that’s just programming!), here’s how to figure out what happened.
Check the logs. Hytale provides detailed logging. Add log statements liberally during development:
getLogger().at(Level.INFO).log("Processing item: %s", itemId);
getLogger().at(Level.WARNING).log("Unexpected state: %s", state);
Start simple. If something doesn’t work, strip it down to the minimum and add complexity gradually.
Verify paths. Most “UI not showing” problems are path issues. Double-check that your UI file exists at the path you specified.
Check the manifest. Ensure your main class path in manifest.json exactly matches your actual class name and package.
Verifying Your Mod Works
You’ve built your mod and installed the files. Now for the exciting part - let’s see if it actually works!
Step 1: Check the server logs
When the server starts, watch for your mod’s log messages. If you used the example code from this guide, you should see:
[INFO] MyAwesomeMod is loading...
[INFO] Setting up MyAwesomeMod...
[INFO] Registered HelloWorld UI page
[INFO] MyAwesomeMod is now active!
If you see these messages, congratulations - your mod loaded successfully! That’s a huge milestone. Take a moment to appreciate it.
Step 2: Give yourself the test item
Once you’re connected to the server, you can give yourself items using the /give command. If you created the MyMod_OpenUI_Tool item from earlier in this guide:
/give @s MyMod_OpenUI_ToolThe item should appear in your inventory.
TIP
If you’re running a local development server with --allow-op, you automatically have permission to use admin commands like /give. On a regular server, you’d need operator permissions.
Step 3: Test your UI
With the item in your hand, right-click (or use your primary interaction key). Your UI should appear on screen.
If everything went well, you should see:
- A semi-transparent dark overlay covering the screen
- Your dialog box centered in the middle
- The title text and welcome message you defined
- A working close button that dismisses the dialog
What if something went wrong?
| Symptom | Likely Cause | Solution |
|---|---|---|
| No log messages from your mod | Manifest not found or Main class wrong | Check manifest.json path and class name match exactly |
| ”Class not found” errors | Plugin JAR not in the right location | Verify JAR is in the Mods folder |
| Item doesn’t exist | Item JSON not extracted properly | Check that Server/Item/Items/ folder exists with your JSON files |
| UI doesn’t appear | Page not registered or path mismatch | Verify page ID in item JSON matches registration, check UI file path |
| UI appears but looks broken | Syntax error in .ui file | Check server logs for UI parsing errors |
NOTE
The first time you test, something almost always goes wrong. That’s completely normal - it happens to everyone, including me. Most issues are simple path mismatches or typos. Check the server logs carefully; they usually tell you exactly what’s wrong.
Common Patterns and Best Practices
After building a few mods, you start to notice patterns that just work. Here are the ones I reach for most often.
Singleton Plugin Access
Make your plugin instance easily accessible:
public class MyModPlugin extends JavaPlugin {
    private static MyModPlugin instance;

    public MyModPlugin(JavaPluginInit init) {
        super(init);
        instance = this;
    }

    public static MyModPlugin getInstance() {
        return instance;
    }

    public static Logger getPluginLogger() {
        return instance.getLogger();
    }
}
Constants Class
Keep magic strings in one place:
public final class MyModConstants {
    private MyModConstants() {}

    public static final String NAMESPACE = "mymod";

    // Page IDs
    public static final String PAGE_ID_HELLO = NAMESPACE + ":hello_world_page";
    public static final String PAGE_ID_SETTINGS = NAMESPACE + ":settings_page";

    // UI Paths
    public static final String UI_PATH_HELLO = "Pages/MyMod/HelloWorld.ui";
    public static final String UI_PATH_SETTINGS = "Pages/MyMod/Settings.ui";

    // Item IDs
    public static final String ITEM_COOL_THING = NAMESPACE + ":cool_thing";
}
Graceful Optional Dependencies
If your mod can work with or without another mod:
public class CompatManager {
    private static boolean hyuiLoaded = false;

    public static void detectMods() {
        hyuiLoaded = isClassPresent("au.ellie.hyui.HyUIPlugin");
    }

    private static boolean isClassPresent(String className) {
        try {
            Class.forName(className);
            return true;
        } catch (ClassNotFoundException e) {
            return false;
        }
    }

    public static boolean isHyUILoaded() {
        return hyuiLoaded;
    }
}
Call CompatManager.detectMods() in your plugin’s setup() method.
Configuration Management
Load configuration from a file:
public class ConfigManager {
    private final Path configPath;
    private ModConfig config;

    public ConfigManager(Path dataDirectory) {
        this.configPath = dataDirectory.resolve("config.json");
    }

    public void load() {
        if (Files.exists(configPath)) {
            // Load from file
            String json = Files.readString(configPath);
            config = new Gson().fromJson(json, ModConfig.class);
        } else {
            // Create default
            config = new ModConfig();
            save();
        }
    }

    public void save() {
        Files.createDirectories(configPath.getParent());
        Files.writeString(configPath, new Gson().toJson(config));
    }

    public ModConfig getConfig() {
        return config;
    }
}
Use it in your plugin:
private ConfigManager configManager;

@Override
protected void setup() {
    configManager = new ConfigManager(getDataDirectory());
    configManager.load();
}
What’s Next
Look at you! You’ve gone from “where do I even start?” to having a real understanding of Hytale modding. You now know:
- How mods are structured and why
- The plugin lifecycle and when to do what
- How to display custom UIs to players
- How to handle UI events and update displays dynamically
- Where assets go and how to reference them
- How to build and test your creation
That’s a lot! Here’s where to go from here:
Your First Hytale UI - This is the natural next step. We’ll dive deep into the CustomUI system, exploring layouts, styling, templates, and creating interfaces that look and feel professional.
The Hytale Modding Community - Join Discord servers and forums where modders share knowledge, ask questions, and collaborate on projects. The community is genuinely helpful, especially to newcomers.
Read Other Mods - One of the best ways to learn is by studying how other mods work. Many are open source and full of clever patterns you can adapt for your own projects.
Just Build Stuff - Honestly, the best teacher is just doing it. Take what you’ve learned here and build something. Start small, break things, fix them, and have fun with it.
If you get stuck or something in this guide didn’t quite click, feel free to reach out. I genuinely love hearing about what people are building.
Happy modding!
Comments